
How to fix loose laptop hinge at home usually comes down to one of three issues: loose hinge screws, cracked plastic mounts, or a hinge that’s simply too tight and tearing the frame apart.
If you catch it early, you can often stop the wobble and prevent bigger damage like a cracked bezel, separated lid, or even display cable strain. If you wait, the hinge keeps levering on soft plastic every time you open the screen, and then the “small wiggle” becomes a full lid separation.
This guide walks you through quick checks, a safe at-home tightening routine, and a few realistic reinforcement options. I’ll also flag the moments where DIY tends to backfire, because hinge repairs look simple until you realize one hidden screw post is already broken.

What a “loose hinge” really means (and why it happens)
Laptop hinges are metal, but they’re anchored into a mix of thin metal brackets and plastic screw posts. The hinge itself may be fine while the mounting points fail, and that’s why the lid starts shifting even if the hinge feels stiff.
- Back cover screws loosen: Common after travel, minor drops, or just years of opening and closing.
- Hinge mounts crack: Plastic posts around the hinge split, so screws no longer bite.
- Hinge torque is too high: The hinge becomes overly tight, and the frame loses the tug-of-war.
- Missing screws: Repair attempts or previous service sometimes leaves one or two out.
According to Apple Support, you should avoid opening the display beyond its designed range and avoid putting pressure on the hinge area, because it can contribute to mechanical stress and enclosure damage.
Quick self-check: which type of hinge problem do you have?
You don’t need to open the laptop to do a first-pass diagnosis. A few small observations save a lot of “take it apart twice” frustration.
5-minute checklist
- Wobble only, no cracking sounds: Often loose screws or slightly backing-out mounts.
- Creaking, popping, or the bezel lifts: Frequently a cracked screw post or broken hinge bracket.
- Lid is hard to open with one hand: Hinge torque may be too tight, which can keep breaking mounts even after tightening.
- Gap near the hinge: The top cover or palm rest clips may be separating.
- Display flicker when moving lid: Stop and be cautious, a display cable may be stressed or pinched.
If you see display flicker, lines, or blackout tied to lid movement, treat this as a “handle gently” situation. You can still inspect, but avoid forcing the hinge open and closed repeatedly.

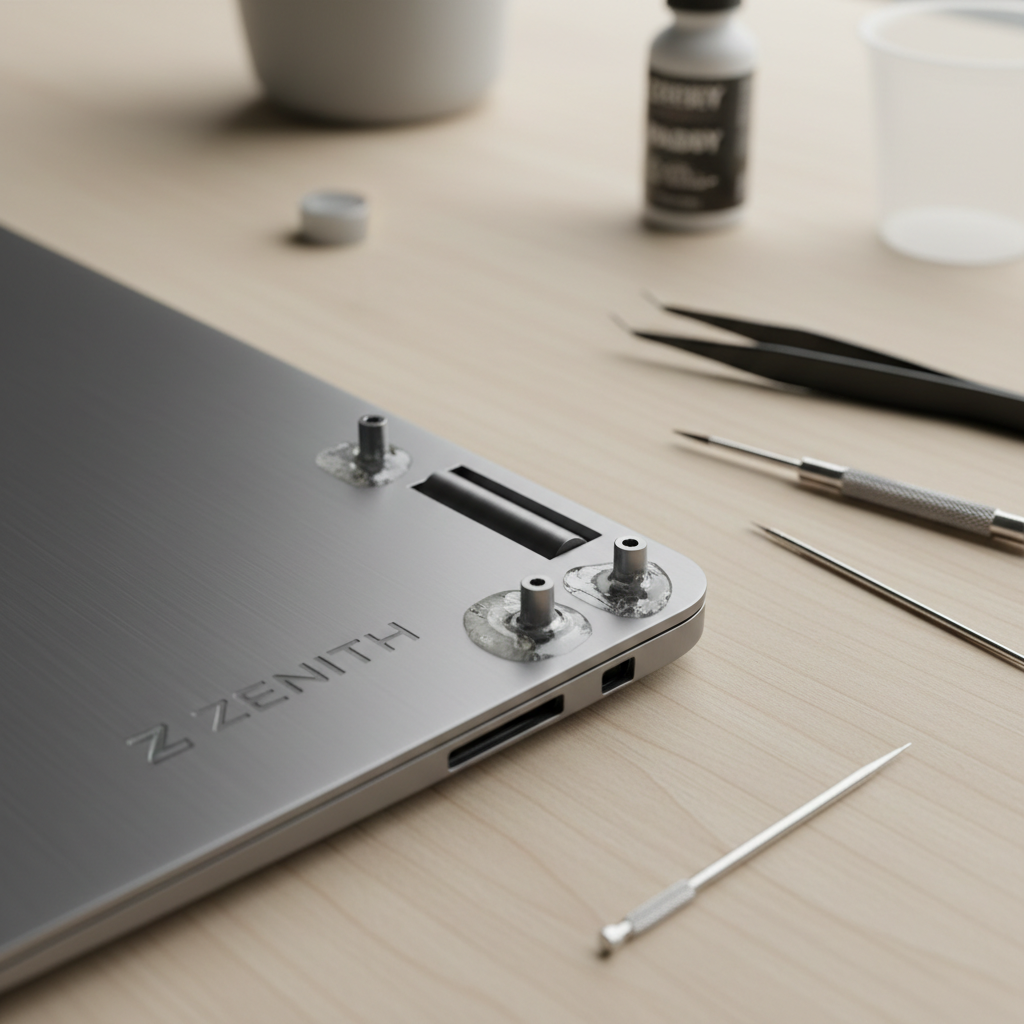
Tools and supplies that make the job smoother
You can attempt basic tightening with minimal tools, but the right bits prevent stripped screws. Many laptops use small Phillips, Torx, or a mix.
- Precision screwdriver set (Phillips #0/#00, Torx T5/T6/T8 are common)
- Plastic pry tools or guitar pick (avoid metal tools near the screen)
- Tweezers for tiny screws
- Blue threadlocker (medium/low strength, optional and used sparingly)
- Isopropyl alcohol and cotton swabs (for cleaning before reinforcement)
- Two-part epoxy or plastic repair compound (only for broken posts, not for simple loosening)
Safety note: power off fully and unplug before opening panels. If your laptop has an internal battery connector you can safely unplug after opening the bottom cover, that reduces the risk of shorting. If you’re unsure, many people choose to stop at “external screw checks” and use a shop for internal work.
Simple fix: tighten accessible screws (no deep repair yet)
This is the “best-case” fix: the hinge is anchored fine, screws just walked loose. It’s also the lowest risk step, so it’s where I’d start.
Step-by-step
- Close the lid, place the laptop on a soft cloth so the top doesn’t scratch.
- Check the bottom case screws around the hinge area, tighten gently until snug.
- Open the lid slowly, test wobble. If improved but not gone, you may need to access internal hinge screws.
Don’t crank screws down. If the screw bites into plastic, overtightening can finish off a post that’s already stressed.
If you decide to remove the bottom cover
- Remove all bottom screws, then use a plastic pry tool to release clips.
- Look for hinge brackets near the rear corners, tighten bracket screws evenly.
- If you use threadlocker, apply a tiny dot to the screw threads, keep it away from plastics and cables.
After tightening, open the lid from the center, not from one corner. That reduces twisting force and gives you a more honest test of stability.
When tightening doesn’t work: mounts are cracked or stripped
If screws spin without tightening, or the hinge bracket lifts away from the frame, you’re in “mount failure” territory. This is where many at-home fixes can still work, but it depends on how the laptop is built.
Common signs you’re dealing with broken posts
- Screw turns but never gets snug
- Plastic around the screw hole looks white, split, or crumbled
- Hinge bracket moves even when screws look present
Realistic at-home reinforcement options
- Epoxy rebuild: Clean the area, rebuild the post base, then re-seat the bracket. Works best when the break is clean and you can clamp gently while curing.
- Heat-set insert replacement (advanced): Some designs allow adding a threaded insert, but you need the right tools and space.
- Replace the part: Often the most reliable fix is a new top cover, palm rest, or bottom case section that contains the mounts.
If you go the epoxy route, keep adhesive away from the hinge pivot and away from the display cable channel. A tiny overflow in the wrong spot can turn a mechanical repair into a cable pinch problem.
Decision table: choose the right fix for your situation
Here’s a practical way to decide what to do next, based on what you found during the check.
| What you notice | Likely cause | At-home approach | Risk level |
|---|---|---|---|
| Minor wobble, no gaps | Loose external/internal screws | Tighten screws, optional tiny threadlocker | Low |
| Wobble + clicking/creak | Mount starting to crack | Open, inspect bracket and posts, tighten carefully | Medium |
| Screw won’t tighten | Stripped post or broken anchor | Epoxy rebuild or part replacement | Medium-High |
| Lid very stiff to move | Hinge torque too high | Consider hinge replacement; tightening alone may worsen damage | High |
| Screen flicker when moving lid | Cable strain or hinge misalignment | Stop excessive testing, inspect cable routing, consider a shop | High |
Key points that keep you from making it worse
- Open from the center, especially while the hinge is unstable, corner-opening twists mounts.
- Match your screwdriver bit, a slightly wrong bit strips tiny heads fast.
- Don’t overtighten, snug is the goal, not maximum force.
- Avoid “super glue” for structural mounts, it tends to become brittle, epoxy usually holds up better for this use.
- Track screw locations, laptops often use different lengths, the wrong screw can dimple the palm rest or damage the display side.
According to Microsoft Support, keeping devices clean and handling them gently helps prevent physical wear, and forcing or twisting hinges can contribute to hardware damage over time.
When to stop DIY and get professional help
There’s a point where “simple fix” becomes “risk a display.” In many cases, paying for a proper hinge mount rebuild or housing replacement costs less than replacing a cracked LCD.
- The bezel is lifting or the lid corners separate when you open it
- The hinge feels gritty, binding, or uneven
- Display issues appear with lid movement
- You see broken metal brackets or cracked magnesium/aluminum frame pieces
- Your laptop is under warranty, opening it may affect coverage, depending on brand and terms
If you’re not sure whether your model allows safe bottom-cover access, check the manufacturer’s service documentation first. According to Dell Support, following the model-specific service manual and safety steps reduces the risk of damaging internal parts during maintenance.
Conclusion: a stable hinge is usually a small job, until it isn’t
Most people searching how to fix loose laptop hinge at home are hoping for a quick tighten-and-done, and sometimes that’s exactly what it is. If tightening changes nothing, assume the mounts are compromised and switch from “more force” to “better support,” because force is what broke it in the first place.
Your next move: do the 5-minute checklist, tighten accessible screws, then decide whether internal inspection makes sense for your comfort level. If the hinge is stiff or the screen flickers, slowing down and asking a repair shop can save you from turning a hinge issue into a screen replacement.
FAQ
How do I know if my loose hinge is just screws or a broken mount?
If screws tighten and the wobble improves, it was probably loosening. If screws spin endlessly, the lid separates, or you hear popping near the hinge, mounts are often cracked or stripped.
Can I use super glue to fix a loose laptop hinge at home?
For structural hinge mounts, super glue often cracks under repeated stress. Many repairers prefer epoxy for plastic post rebuilds, though it still requires careful prep and curing time.
Is threadlocker safe for laptop hinge screws?
Usually a tiny amount of blue threadlocker can help keep metal-to-metal screws from backing out, but keep it away from plastics and cables. If your screws bite into plastic posts, threadlocker may not help much.
Why is my hinge loose but also hard to open?
This combo often shows up when the hinge torque is high and the mounts are failing. The hinge fights you, the plastic loses, and then everything feels unstable. In that case, hinge replacement or mount rebuild tends to be more realistic than tightening alone.
Will opening the laptop void my warranty?
It depends on the brand and warranty terms. If you’re still covered, it’s often smarter to contact the manufacturer first, because hinge and enclosure issues are sometimes handled as hardware defects.
How much can I tighten hinge screws without breaking anything?
Use light, controlled pressure and stop when you feel resistance. If you’re tightening into plastic, overtightening can strip posts quickly, so “snug” beats “as tight as possible.”
What if the screen flickers when I move the lid?
That can mean the display cable is stressed or routed poorly due to hinge movement. Reduce opening/closing tests and consider professional inspection, since cable damage can escalate fast.
Lightweight next step (if you want the simpler route)
If you’re trying how to fix loose laptop hinge at home but you’d rather not gamble on hidden clips, cable routing, or epoxy work, a local repair shop can usually confirm whether it’s a screw-tightening job or a mount rebuild in one quick inspection, and that clarity alone saves a lot of trial and error.